How to Vinyl Wrap a Car and Transform Its Look Today
Vinyl wrapping your car is one of the best ways to transform its look without permanent changes. This guide walks you through every step of the DIY car wrap process, from choosing the right vinyl wrap film to applying it like a pro. You will learn the essential car wrap tools, avoid common mistakes, and keep your wrap looking fresh for years.
Have you ever looked at a car with a stunning color change wrap and thought, “I wish my car looked like that”? Well, here is the good news. You can achieve that same stunning transformation with a vinyl wrap. And the best part? You do not need to spend thousands at a body shop.
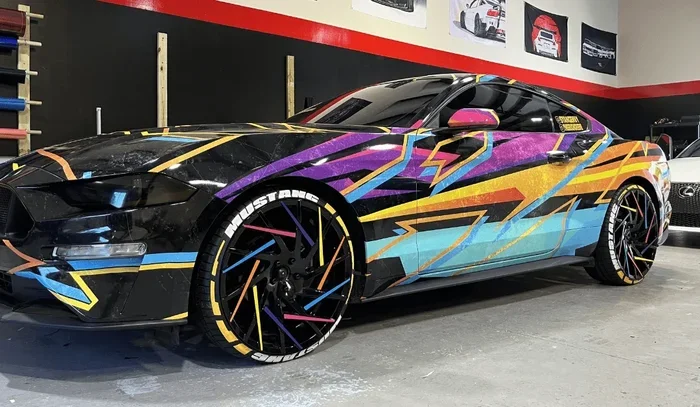
How to vinyl wrap a car is a skill that anyone can learn with the right guidance. Whether you want a matte black finish, a bold custom design, or simple paint protection, a car wrap delivers incredible results. In this guide, we break down the entire process into easy-to-follow steps. By the end, you will feel confident enough to grab your wrap vinyl and get started.
Let us be real for a second. Wrapping a car is not a five-minute job. It takes time, patience, and attention to detail. But the payoff is huge. A properly applied vinyl car wrap looks factory-quality. It protects your original paint. And it gives you the freedom to change your car’s appearance anytime you want. So let us dive in.
Key Takeaways
- Vinyl wrapping is reversible: Unlike paint, a color change wrap can be removed without harming the original finish.
- Preparation is everything: A clean, smooth surface is the foundation of a flawless wrap application.
- You need the right tools: A heat gun, squeegee, and quality vinyl wrap film make all the difference.
- Patience pays off: Rushing the process leads to wrinkles, bubbles, and an uneven finish.
- Maintenance extends lifespan: Proper care can keep a vinyl wrap looking great for 5 to 7 years.
- Not every project is DIY-friendly: Complex curves and full-body wraps may require a professional touch.
📑 Table of Contents
What Is a Vinyl Car Wrap and Why Do People Do It?
A vinyl car wrap is a thin layer of specially designed film that adheres directly to your car’s exterior surface. Think of it like a giant sticker that covers your vehicle from roof to bumper. The wrap vinyl film comes in countless colors, finishes, and textures. You can go with a classic gloss wrap, a trendy matte wrap, or even a chrome wrap that turns heads everywhere you park.
People choose to wrap a car for many reasons. Some want a color change wrap without the cost and permanence of repainting. Others use paint protection film to shield their original paint from scratches, UV rays, and road debris. Businesses wrap fleet vehicles for advertising. Car enthusiasts wrap their rides for shows and events. Whatever your reason, a car wrap is a versatile and reversible solution.
The vinyl wrap lifespan typically ranges from 5 to 7 years with proper care. That means your investment pays off over time. Unlike a new paint job, a wrap removal process leaves your original paint untouched and intact. This makes DIY car wrap projects especially appealing for people who lease their vehicles or plan to sell soon.
Types of Vinyl Wrap Finishes
Not all wrap vinyl is the same. The finish you choose sets the tone for your entire look. Here are the most popular options:
- Gloss finish: This is the classic shiny look. It makes colors pop and gives your car a polished, showroom-ready appearance.
- Matte finish: A flat, non-reflective surface that looks sleek and modern. Matte wraps are hugely popular right now.
- Satin finish: A middle ground between gloss and matte. It has a subtle sheen that works well on many car colors.
- Chrome finish: Mirror-like and bold. Chrome vinyl wrap is a statement piece that demands attention.
- Textured finishes: These include carbon fiber wrap, brushed metal, and even leather textures. They add depth and dimension.
Tools and Materials You Need for a Car Wrap
Before you start wrapping a car, you need the right gear. Using low-quality materials or skipping essential tools will only lead to frustration. Let us go over everything you need to gather before you begin your car wrap installation.
Essential Materials
- Vinyl wrap film: Choose a high-quality cast vinyl wrap for durability and conformability. Budget films work for simple projects but may not last as long.
- Application fluid: Also called slip solution. This helps you position the film and prevents premature adhesion.
- Pre-wax cleaner: You need a clean surface. A pre-wax cleaner removes oils, wax, and contaminants.
- Isopropyl alcohol (IPA) solution: A mix of IPA and water (about 10% IPA) helps degrease the surface before application.
- Transfer tape: This helps you lift and reposition large sections of film during application.
Essential Tools
- Heat gun: This is your best friend during wrap application. Heat softens the vinyl, allowing it to stretch around curves and contours.
- Squeegee: A hard-edged squeegee pushes out water and air bubbles. A felt-edge squeegee works well for tight areas.
- Plastic trim tools: These help you tuck film around edges without scratching your car.
- Sharp utility knife: You will need to trim excess film cleanly.
- Microfiber cloths: Keep plenty on hand for wiping down surfaces and cleaning up excess application fluid.
- Rubbing alcohol (90%+): For final surface degreasing before application.
Pro tip: Do not cheap out on your vinyl wrap materials. A quality cast vinyl film is easier to work with, conforms better to curves, and lasts significantly longer than a cheap calendered vinyl. Your car wrap tools matter just as much as the film itself.
Step-by-Step: How to Vinyl Wrap a Car
Now for the part you have been waiting for. Here is the actual process of wrapping a car step by step. Follow these instructions carefully, and your DIY car wrap will look professional-grade.
Step 1: Prepare the Vehicle
The most important step in how to vinyl wrap a car happens before you even touch the film. You must prepare the surface properly. Any dirt, wax, or grease will cause the wrap to fail.
- Wash the car thoroughly with a car wash soap. Remove all dirt, dust, and road grime.
- Use a clay bar to remove embedded contaminants from the paint surface.
- Wipe down each panel with IPA solution using a clean microfiber cloth.
- Make sure the car is completely dry before you begin application.
- Work in a shaded, temperature-controlled area. Direct sunlight and extreme temperatures make wrap application much harder.
Step 2: Measure and Cut Your Vinyl
Measure each panel of your car carefully. Add about 2 to 3 inches of overlap on each edge. This gives you room to maneuver the film and trim it later. Cutting the vinyl wrap film to size before application saves you a lot of hassle during the process.
For curved areas like fenders and bumpers, you may need to cut relief lines. These small slits allow the film to conform around tight curves without bunching up. Practice on scrap film first if you are new to DIY car wrapping.
Step 3: Apply the Application Fluid
Spray your slip solution generously onto the panel and the back of the vinyl. The fluid creates a slippery layer that lets you slide the film into position. Without it, you will not be able to adjust the placement, and you will end up with an uneven car wrap finish.
A good mix is about 10% isopropyl alcohol to 90% water in a spray bottle. Some people also add a tiny drop of dish soap. The goal is a slippery surface that still allows the film to eventually bond properly.
Step 4: Apply the Vinyl Film
This is where the real work begins. Start at one edge of the panel and slowly lay the film down. Use your squeegee to push the fluid and air toward the opposite edge. Work in sections, especially on large panels like hoods and roofs.
Here is a technique that makes a big difference: use a felt squeegee for the initial pass, then follow up with a hard plastic squeegee to fully press the film onto the surface. The combination of soft and hard pressure gives you the best results.
Step 5: Use the Heat Gun
Once the film is in place, go over it with your heat gun. Hold the gun about 6 to 8 inches from the surface. Move it in slow, sweeping motions. The heat activates the vinyl wrap adhesive and helps the film conform to every curve and contour.
You will notice the film becomes more pliable when heated. This is exactly what you want. Use this window to push out any remaining air bubbles and smooth out wrinkles. If the film starts to cool and stiffen, reheat it before trying to adjust again.
Step 6: Trim and Finish
Once the film is fully adhered, use a sharp utility knife to trim the excess material. Go slow and let the blade do the work. Pressing too hard can scratch your paint or cut into the film you want to keep.
Use plastic trim tools to tuck the edges neatly around mirrors, door handles, and trim pieces. A clean finish around these details is what separates a professional-looking car wrap from a sloppy one.
Repeat this process panel by panel until the entire vehicle is wrapped. For complex areas like the front bumper and rear bumper, take your time. These are the spots where wrapping mistakes are most likely to happen.
Common Mistakes to Avoid When Wrapping a Car
Even experienced DIY wrap enthusiasts make mistakes. The key is knowing what to avoid. Here are the most common errors people make during car wrap installation:
- Skipping surface preparation: This is the number one cause of wrap failure. If your surface is not clean and degreased, the vinyl wrap adhesive will not bond properly.
- Applying in direct sunlight: Heat from the sun causes the film to stick too fast. You will not be able to reposition it, and you will end up with a poor wrap finish.
- Using too much heat: A heat gun is essential, but too much heat can shrink or damage the vinyl film. Keep it moving and maintain a safe distance.
- Rushing the squeegee work: Air pockets and wrinkles form when you do not apply even pressure. Take your time with each pass.
- Not using enough application fluid: Running out of slip solution mid-application forces you to reposition the film, which weakens the bond.
- Cutting corners on material quality: Cheap wrap vinyl is harder to work with and does not last as long. Invest in good quality for better results.
How to Care for Your Vinyl Wrap
Your car wrap is not high maintenance, but it does need regular care to look its best and last for years. Here is how to keep your vinyl wrap in top condition.
Washing Your Wrapped Car
Wash your wrapped car at least once every two weeks. Use a gentle car wash soap and a soft microfiber mitt. Avoid high-pressure washers directly on the edges of the wrap, as the force can peel the edges loose over time.
Hand drying is always better than air drying. Use a clean, soft microfiber towel to prevent water spots. If you notice any air bubbles forming after washing, gently press them out with your squeegee while applying light heat from your heat gun.
What to Avoid
- Automatic car washes: The harsh brushes can peel or scratch your vinyl wrap. Stick to hand washing whenever possible.
- Abrasive cleaners: Never use harsh chemicals or abrasive pads on your wrap. Stick to pH-neutral cleaners designed for vinyl film.
- Waxing: Do not apply traditional wax to a wrapped surface. The chemicals can break down the vinyl wrap adhesive and cause peeling.
- Parking under trees: Bird droppings and tree sap can damage vinyl wrap if left too long. Clean them off promptly.
How Long Does a Vinyl Wrap Last?
A well-maintained vinyl car wrap typically lasts between 5 and 7 years. The wrap lifespan depends on several factors:
- The quality of the vinyl film you chose
- How often you wash and maintain the wrap
- How much sun exposure your car gets daily
- Whether you park indoors or outdoors most of the time
- The climate you live in (extreme heat or cold shortens lifespan)
If you take good care of your color change wrap, it will look great for many years. And when you are ready for a change, the wrap removal process is straightforward and leaves your original paint untouched.
When Should You Hire a Professional Instead of DIY?
Here is an honest truth. Not every vinyl wrap project is suited for a DIY approach. Some situations call for a professional car wrap installer. You should consider hiring a pro if:
- You are wrapping a full-body vehicle for the first time
- Your car has complex curves, aggressive body lines, or many recessed panels
- You are using a chrome wrap or other high-end finish that demands perfection
- You need the wrap done quickly for an event or deadline
- You do not have access to the right car wrap tools
A professional wrap installation typically costs between $2,000 and $5,000 for a full vehicle wrap. While this is more than a DIY project, the quality and durability are hard to match. If you are unsure about your skills, start with a smaller project like a hood or a set of mirrors. This gives you hands-on vinyl wrap experience without the pressure of wrapping an entire car.
Key Takeaways
- Vinyl wrapping is reversible: Unlike paint, a color change wrap can be removed without harming the original finish.
- Preparation is everything: A clean, smooth surface is the foundation of a flawless wrap application.
- You need the right tools: A heat gun, squeegee, and quality vinyl wrap film make all the difference.
- Patience pays off: Rushing the process leads to wrinkles, bubbles, and an uneven finish.
- Maintenance extends lifespan: Proper care can keep a vinyl wrap looking great for 5 to 7 years.
- Not every project is DIY-friendly: Complex curves and full-body wraps may require a professional touch.
What Is the Best Vinyl Wrap for Beginners?
For beginners, a cast vinyl wrap in a solid color like matte black or satin white is the best starting point. Cast vinyl film is more forgiving during application because it conforms easily to curves. Avoid complex patterns or textures until you gain more experience with DIY car wrap projects.
Can You Wrap a Car Over Existing Paint?
Yes, you can apply a vinyl wrap directly over existing paint. In fact, this is one of the biggest advantages of car wrapping. The wrap protects the original paint underneath. Just make sure the existing paint is in good condition with no chips or peeling before you begin.
How Long Does It Take to Wrap a Car?
A full DIY car wrap can take anywhere from 2 to 5 days depending on your experience level and the complexity of the vehicle. Simple sedans take less time. SUVs and trucks with more surface area will take longer. Professional installers can usually complete a full wrap in one to two days.
Does a Vinyl Wrap Damage the Car’s Paint?
No, a properly applied and removed vinyl wrap will not damage your car’s original paint. The vinyl wrap adhesive is designed to release cleanly. However, if the paint is already in poor condition or has existing damage, there is a small risk of pulling up loose paint during wrap removal.
How Much Does It Cost to Wrap a Car Yourself?
The material cost for a DIY car wrap typically ranges from $500 to $2,000 depending on the size of the vehicle and the quality of the vinyl wrap film. Add in the cost of car wrap tools like a heat gun, squeegee, and application fluid, and your total investment is still significantly less than a professional installation.
Can You Wrap Only Part of a Car?
Absolutely. Partial wraps are very popular. You can wrap just the hood, the roof, the mirrors, or the accents. This is a great way to experiment with vinyl wrapping before committing to a full color change wrap. Partial wraps also cost significantly less and take less time to complete.
Conclusion
How to vinyl wrap a car is a skill that opens up a world of possibilities. You can completely transform your car’s appearance, protect its original paint, and even boost its resale value. The process takes patience and practice, but the results are well worth the effort.
Start small if you are new to DIY car wrapping. Practice on a single panel. Learn how the vinyl wrap film responds to heat and pressure. Once you feel confident, take on bigger sections and eventually the full vehicle.
Remember that the key to a flawless car wrap comes down to three things: proper preparation, quality materials, and patience during application. Avoid the common mistakes we covered, care for your wrap properly, and it will look amazing for years to come.
Your car is one of your biggest investments. A vinyl wrap lets you express your personal style while keeping that investment protected. So grab your car wrap tools, pick your favorite wrap finish, and start your transformation today. The road ahead looks a lot better when your car looks incredible.
Frequently Asked Questions
What is How to Vinyl Wrap a Car?
How to Vinyl Wrap a Car is an important topic with many practical applications.